Last Updated on November 22, 2023
A plaster cast, slab or splint is applied in broken bones of upper or lower extremity. Plaster can be applied for a temporary period while waiting for definitive treatment or it could be definitive treatment in itself.
The basic aim of a plaster application is immobilization of the fracture fragments and joints.
A plaster could be used in the following situations
- A temporary measure of pain relief and reduction of swelling so that definitive treatment could be executed.
- For immobilization of joints in case of ligament injury, joint swelling due to disease.
- A splint for undisplaced fractures.
- A definitive treatment where plaster is applied to maintain the reduction of the fragments.
- External splint to aid with the internal fixation of the fractures, osteotomies and other bone surgeries where internal fixation alone would not be able to withstand loads.
- External splint for blocking movements in case of nerve, tendon or vessel repair.
Properties of Plaster of Paris
Traditionally plaster of Paris casts is used. You must have seen those white colored casts, those are made of plaster of Paris or POP.
Plaster of Paris, in its raw state, is termed gypsum hydrated calcium sulfate with impurities. The surgical form is pure anhydrous calcium sulfate.
The essential chemical step is the heating of gypsum to 120 degree Celsius (250 degree F).
Adding water allows for a return to the original crystalline state of full hydration. Twenty percent of added water is incorporated into the hydrated crystal lattice but the other 80 percent of water eventually evaporates.
The absorption of water while setting gives out heat (an exothermic reaction).

Plaster of Paris extremely safe and does not produce allergies. It is infinitely adaptable to the part being splinted and can be applied speedily without gloves. It cheaper in comparison with more modern materials.
However, plaster of Paris is slow to dry, to gain full strength and is seriously weakened if it becomes wet again. It is very heavy when wet but becomes much lighter when dry.
It is partially radio-opaque, obscuring bone detail on radiographs.
Low temperatures and sugar solutions retard the setting of plaster of Paris while high temperatures and salt or borax solutions accelerate it.
The setting time is three times longer at 5 degree Celsius (40 degrees F) than at 50 degree Celsius (125 degrees F).
Although setting takes only a few minutes, drying may take many hours – roughly 36 hours for an arm cast, 48-60 hours for a leg cast and up to 7 days for a hip spica, especially if the atmosphere is moist and cool.
Movement of the plaster, while it is setting, will cause gross weakening.
The optimum strength is achieved when it is completely dry.
Plaster of Paris casts are frequently used to put casts in fracture patients. Although Plaster of Paris only depends on one simple chemical reaction for its setting, it is possible to vary the features of the process according to different requirements.
If a bandage is immersed in cold water the initial set will be delayed and thus “working time” lengthened. However, if a very rapid set is required soaking the bandage in warm water will accelerate the rate of reaction.
The cast strength depends upon the thickness of plaster and the shape of the cast which follows the contours of the affected limb. However, excess plaster will also increase weight and bulk and heat product. Therefore these different factors must be weighed against each other.
Because plaster of Paris is infinitely mouldable in the wet state it can be set around cast brace hinges and walking heels with ease.
Principles of Plaster Cast Application
Extent
Rule of thumb for plaster applications block a joint above and below the fracture. This is done as a movement of either joint can cause movement in fracture fragments.
For immobilizing the joint, a plaster should be adequate enough to counter the forces of the muscles that move the joint.
Majorly, a plaster, depending on its extent, could be
Above Elbow
An above elbow plaster cast or slab is applied from knuckles of hand [distal palmar crease anteriorly] and covers lower two-thirds of arm
Below Elbow
While distal extent is same as above, proximally the plaster ends below elbow crease.
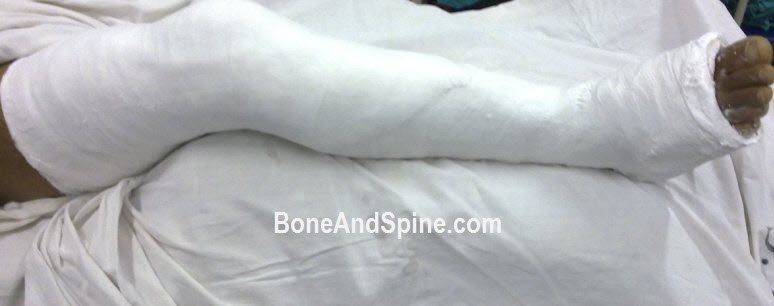
Above Knee
Distal extent is up to metatarsophalngeal joints and proximally it covers lower two-thirds of the thigh.
Below Knee
Distal extent is same, proximal extent ends below the knee.
There are various other types of casts used in case of a number of fractures where the extent and position is defined by the type of plaster applied.
Plaster slabs or cast may have the same extent but different joint positions depending upon conditions.
Plaster Slabs and Plaster Casts
A plaster cast is a circumferential application of plaster bandages. The cast is stronger by virtue of being circumferential than slabs, control the reduction of fragments better and withstand mechanical stresses better. Most of the closed reductions of the fractures require a cast application.
The slab is a support created from plaster material which is applied on one aspect of the limb and secured with cotton bandages. Sometimes, two slabs may be applied, for example, one anterior and second posterior, for better strength and control.
Slabs are applied in a case where there is swelling, poor skin condition that needs to be observed like blisters, after internal fixation to aid the fixation, while waiting for definitive treatment. Many undisplaced fractures are treated by slab application.
Padding
Though few people had advocated this in the past, a plaster cast or slab is not applied without the padding.
Soft resilient material such as wool felt and special orthopedic padding is placed on the skin before plater application.
Padding serves to
- prevent sores
- increase comfort
- act as a spacer to aid removal.
An unpadded cast has the danger of swelling which is less with padded casts as the padding buffers the space needed for the swollen tissue.
The cast is also difficult to split and bivalve.
Removal of the cast is also difficult and uncomfortable for the patient.
How to Apply Plaster Cast and Slab
For details of the procedure, please click on the relevant link.
Plaster of Paris Cast Application
First of all, stockinette is applied over the area to be plastered and covered by the soft cotton padding of the required width firmly over the area.
For securing, each turn is overlapped by one third in order to secure layers.
The patient is settled in a comfortable position with clothing protected. The equipment is readied [water in bowl bandages]
The affected part should be covered with suitable padding and the desired position secured and held correctly. Bandages of the correct size are immersed in water, one at a time, and held there until bubbling stops. The bandage is removed by holding it at the ends. The ends are gently squeezed towards the center then pulled back to shape.
The bandage is unrolled around the limb in an even manner. Minimum tension should be exercised and this should be directed towards the center of the bandage-not at the edges.
Molding of the bandages to the contours of the limb should be done by constant smoothing with the palms of the wet hands.
When the required thickness has been obtained, the extremities of the plaster of Paris cast may require trimming to ensure that a free range of movement is possible at joints which are not immobilized. The completed wet cast is handled carefully and supported correctly to protect it from damage.
The cast does not fully dry out until 36 to 72 hours after application.
When a dry plaster of Paris cast is tapped with the knuckles, it gives a crisp, clear sound, but the damp cast gives a dull sound.

Slab Application
Slabs can be prepared by unrolling plaster bandage to a required length or by withdrawing the required length of layers from a plaster dispenser. This may be done with either wet or dry bandages which are folded out on a smooth surface. This average thickness of slabs for strengthening is 12-16 layers. The thickness might be adjusted from patient to patient.
When using bandages care must be taken to see extends for the same distance. Short ends should be discarded because they cannot be held securely when the slab is immersed in water. The slab can be prepared in any width, depending on the needs of the situation. Sometimes a slab is used for initial immobilization and is completed later. Slabs must be smoothed carefully on a flat surface after they have been soaked.
Plaster of Paris casts become supportive in three to five minutes, depending on the water temperature and the thickness of the cast.
Care of Plaster Cast
Plaster cast application is not the end of the treatment. Care of plaster cast is very necessary. All patients need to be given instructions about how to take care of plaster cast and preferably in writing.
Following instructions for care of plaster cast should be given to every patient who has got a cast applied.
Do Not Interfere
Plaster cast extent and thickness is decided by the injury to be treated, body habitus and type of the cast.
The patient should be instructed not to wet, cut, heat or otherwise interfere with the plaster.
Report At Once If-
All the casts in case of acute fractures should be recalled the next day to note any discomfort, bluishness, swelling and numbness of the digits.
- If the plaster cracks and becomes loose or otherwise uncomfortable.
- If there is any pain that is not relieving or worsening.
- If there is any discharge or high-grade fever
- If the fingers or toes become numb or difficult to move.
- If the fingers or toes become swollen or blue.
- If there is a burning sensation at any point throughout the cast extent. It usually occurs due to plaster digging in the skin
Elevate As Instructed
The plaster may feel tight for some time after application. This can usually be relieved by lying down and elevating the arm or leg on one or more pillows and by constantly moving those joints of the arm and leg that are not covered by plaster.
For the first twenty-four hours keep the limb raised as much as possible. In case of upper limb, a sling should be used to elevate the limb. For lower limb injuries, the limb is placed on a cushion or pillow.
Move The Digits
The patient should be instructed to move the fingers or toes of the affected limb. This encourages the return of the blood due to pumping of blood by muscles and also in the reduction of swelling.
Drying Time of Cast
Plaster of Paris casts become supportive in three to five minutes, depending on the water temperature and the thickness of the cast. The cast does not fully dry out until 36 to 72 hours after application.
When a dry cast is tapped with the knuckles, it gives a crisp, clear sound, but the damp cast gives a dull sound.
Till the cast dries, it has not reached its full strength and might break with stress. It is important in weight bearing casts of walking casts and the patient should be instructed accordingly.
At home, the patient must be advised not to rest the wet cast on a firm surface such as an unpadded chair. This will dent the cast and produce a ridge on the internal surface which may cause soreness. Unsuspected hazards, such as the ridge on the arm of a chair, can cause a dent in still-damp plaster.
Sitting in sunlight or in where the air is circulating adequately would hasten the drying time.
Cast Protection
In case of walking casts, a reinforcing sole or heel of wood or rubber should be added after the cast has dried.
Canvas or plastic coverings may be used for short periods to protect the cast from water. These must be removed regularly to prevent the plaster from becoming damp as sweat fails to evaporate.
Forearm casts are particularly prone to getting wet at the lower edge which may fray. Small fragments may be detached and slip between the skin and plaster causing irritation.
The patient should be instructed to be careful. {Wetting does not affect the fiberglass cast per se, but even in these cases, water may percolate to the padding where it would affect the skin.
Assistive devices Persons with Casts
Ambulation with casts may require assistive devices. Most of the assistive devices are required for lower limb or trunk casts. These are
- Crutches
- Walkers
- wheelchairs
General Instructions For Patients
For Care of Plaster Cast
- Keep the cast clean and dry.
- Check for cracks or breaks in the cast.
- Pad the rough edges to protect the skin from scratches.
- Do not scratch the skin under the cast by inserting objects inside the cast. Instead one can use a hairdryer placed on a cool setting to blow air under the cast and cool down the hot, itchy skin. Never blow warm or hot air into the cast.
- Do not put powders or lotion inside the cast.
- Prevent small toys or objects from being put inside the cast.
- Elevate the cast above the level of the heart to decrease swelling and move the fingers or toes to promote circulation.
- Do pull support or lift the person by cast or bar on the cast.
- Spica casts need special care especially using bedpan or urinal. Tips to keep body casts clean and dry and prevent skin irritation around the genital area include the following:
- Use a diaper or sanitary napkin around the genital area to prevent leakage or splashing of urine.
- Place toilet paper inside the bedpan to prevent urine from splashing onto the cast or bed.
- Keep the genital area as clean and dry as possible to prevent skin irritation.