Last Updated on November 20, 2019
Different types of orthopedics splints are used for management of various musculoskeletal conditions. Orthopedic splints are noncircumferential immobilizers. That means they do not cover the limb they splint circumferentially, unlike cast.
Because of being non-circumferential, they can accommodate the swelling that might arise after the injury. In this sense, they are more forgiving and safer than casts.
Splints are commonly used for injuries of limb, for acute fractures or sprains both.
Orthopedic splints are used both as measures to support injured limb in an emergency or definitive treatment.
The purpose of splinting in orthopedics acutely is to immobilize and protect the injured extremity, aid in healing, and lessen pain. Different types of splints are used at different sites.
Though they are not circumferential, orthopedic splints can still cause many complications and the patient needs to be monitored after application. Moreover, the complications of immobilization like joint stiffness, muscle atrophy, or more severe complications, such as complex regional pain syndrome may occur with splinting also.
The procedure splinting begins by placing the injured extremity in its position of function. It is important to maintain good anatomic fracture alignment.
Why Should Fractured Bone Be Splinted?
A fracture is a break in the continuity of the bone. Fracture splints are the methods and materials to immobilize the fracture for transport when fracture or break in the bone can result from an injury.
A fracture occurs when a force acts on bone and bone can not effectively resist the force and gives way. The fracture can result from a substantial injury or may occur after a trivial injury depending upon bone strength.
It can vary from a simple crack or hairline fracture to a grossly displaced in which the broken fragments of bones have been pulled away from each other by muscular forces.
There are 206 bones in the human body. When a bone is broken or fractured, it affects not only blood production and function, but there can be complications associated with the muscles, tendons, nerves and blood vessels that are attached, or are close, to the bone.
Why splint a fracture, you might ask. As we noted before, the fracture may be displaced or undisplaced. Both the conditions are painful.
If the fracture site is not splinted more soft tissues could be damaged which could significantly prolong healing.
An orthopedic splint helps the injured limb by
– Providing rest to the injured area
– Preventing further displacement of the bone fragments
– Protect underlying vessels and nerves from the fracture fragments which can be injured due to movements of fracture fragments in an unsplinted limb.
Bone is covered by a membranous layer called periosteum. Bone per se does not feel the pain. Pain receptors are present in periosteum only.
The pain that a person feels after fracture is felt by soft tissues around the bone and periosteum.
Whenever the fragments of fractured bone move, the person feels severe pain. Therefore it is essential to immobilize the fractured fragments so that minimal instances of pain occur.
Splint immobilizes the injured part and reduces pain.
Also, when there is a movement of fractured fragments there is a danger of injury to accompanying blood vessels & nerves that traverse the limb. If a fracture is immobilized, these structures stay protected.
Injured bone bleeds and this results in swelling at the fracture site due to the accumulation of blood. If a limb is allowed to remain unsplinted, there is a higher risk of bleeding and potential complication which can occur with such continued bleeding.
In nutshell, a splint reduces pain & minimizes the chance of associated complications. Anything can be used to splint a fractured bone- a roll of newspaper cardboard, umbrella, stick are a few examples.
Whenever splinting is done, it is necessary to immobilize one joint above and one joint below the fracture for maximum immobilization.
For example, if there is a fracture in leg bone (i.e. tibia), both ankle joints and knee joints need to be included in splinting.
This principle is followed in most of splinting methods with few exceptions.
How To Splint A Fractured Bone?
The fractured area should be splinted with whatever material available around the place of injury. It can be some wooden strip, a roll of newspaper or roll of small wooden sticks or umbrella.
Anything!
If there is active bleeding from the wound, the wound should be covered and bandaged tightly, with sterile clothing if anything else is not available.
The limb should be splinted in a most comfortable position or in a position that could be attained.
The patient should be rushed to the nearest medical center after the splintage and immobilization.
Different Types of Orthopedic Splints
Hand/finger
- Ulnar gutter
- Radial gutter
- Thumb Spica
- Finger Splints
Forearm/wrist
- Volar short arm splint
- Dorsal short arm splint
- Single sugar-tong
Elbow/forearm
- Long arm posterior
- Double sugar-tong
- Long arm
Knee
- Posterior knee splint
- Long leg splint
Tibia/fibula
- Long leg splint
- Short leg shaft and distal)
Foot
- Posterior ankle splint
- High-top walking boot
Common Orthopedic Splints for Hand/Finger
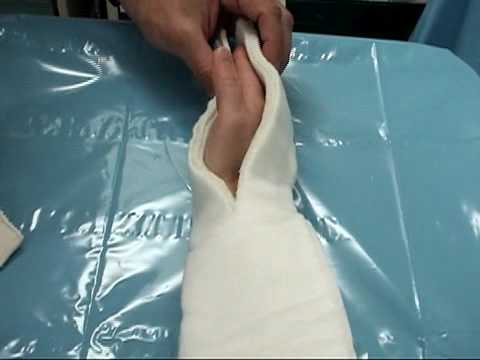
Ulnar Gutter Splint
Ulnar gutter splint begins at the proximal forearm and extends to just beyond the distal interphalangeal joint. It is used for undisplaced, stable fractures of the head, neck, and shaft of the fourth or fifth metacarpal with mild angulation and no rotational deformities.

[More on metacarpal fractures]
It can also be used soft tissue injuries of the fourth or fifth, proximal or middle phalanx.
[More on phalangeal fractures]
For the splint, the wrist is slightly extended with the metacarpophalangeal joints in 70 to 90 degrees of flexion, and the proximal interphalangeal and distal interphalangeal joints in 5 to 10 degrees of flexion.
Radial Gutter Splint
The radial gutter splint is used for
- Nondisplaced fractures of the head, neck, and shaft of the second or third metacarpal without angulation or rotation
- Nondisplaced shaft fractures and serious injuries of the second or third, proximal or middle phalanx; initial immobilization of displaced distal radius fractures.
The splint is put along the radial aspect of the forearm and extends from just beyond the distal interphalangeal joint of the index finger, leaving the thumb free. Proximally, the extent is up to just short of elbow joint.
The wrist is placed in slight extension, with the MCP joints in 70 to 90 degrees of flexion, and the interphalangeal joints in 5 to 10 degrees of flexion.
Thumb Spica Splint
Thumb spica splint is used for
- Suspected injuries to the scaphoid
- Stable ligamentous injuries to the thumb
- Initial treatment of nonangulated, nondisplaced, extra-articular fractures of the base of the first metacarpal
- de Quervain tenosynovitis
- First carpometacarpal joint arthritis.
The splint covers the radial aspect of the forearm, from the proximal one-third of the forearm to just distal to the interphalangeal joint of the thumb.
The forearm is in the neutral position with the wrist extended to 25 degrees and the thumb in a position of function. Imagine holding a glass or a cold drink can. This is the functional position of the thumb.
Buddy Taping or Dynamic Splinting

It is a simple orthopedic splint used in minor finger sprains and stable, undisplaced shaft fractures of the proximal or middle phalanx
The injured finger is taped to the adjacent finger for protection and to allow movement
Dorsal Extension Block Splint
This splint is used in
- Middle phalangeal volar avulsions with potential for dorsal subluxation
- Reduced, stable proximal interphalangeal joint dorsal dislocations.
The splint is applied with the proximal interphalangeal joint at 45 degrees of flexion and secured at the proximal part of the finger crossing metacarpophlanageal joint.
The flexion is decreased 15 degrees until reaching full extension over four weeks. Buddy taping should follow.
U Shaped Aluminum Splint
Used most commonly in distal phalangeal fractures. The aluminum splint wraps from the dorsal fingertip around to the volar fingertip and immobilizes only the distal interphalangeal joint in extension.
Mallet Finger Splint
It is used in cases of mallet finger or avulsion of the extensor tendon from the base of the distal phalanx with or without an avulsion fracture.
For this splint, the distal interphalangeal joint is placed in slight hyperextension with a padded dorsal splint, an unpadded volar splint, or a prefabricated mallet finger splint.
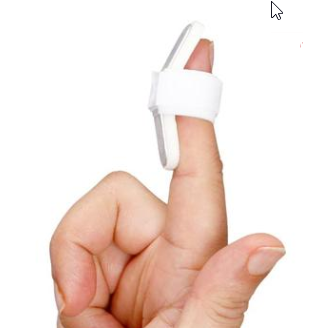
The splint is kept for 6-8 weeks.
Night splinting for an additional two to three weeks is recommended.
Volar/Dorsal Forearm Splints
These splints are used in
- Soft tissue injuries of the hand and wrist
- Temporary immobilization of carpal bone dislocations or fractures (excluding scaphoid and trapezium).
The splint extends from the dorsal or volar mid-forearm to the distal palmar crease
The wrist is slightly extended.

The splint does not limit forearm pronation and supination. It could be a definitive treatment for wrist buckle fractures in children.
Sugar Tong Splints
Single Sugar Tong Splint
It is used in the acute management of distal radial and ulnar fractures.
The splint extends from the proximal palmar crease, along with the volar forearm, around the elbow to the dorsum of the MCP joints
The forearm is neutral and the wrist is slightly extended.
The splint does not restrict forearm supination and pronation.
Double Sugar-Tong Splint
Double sugar tong splint is used in the management of elbow and forearm injuries.
First, a single sugar tong splint is applied as described above.
A second sugar-tong splint is then applied, extending from the deltoid insertion distally around the 90-degree flexed elbow, and proximally to 3 inches short of the axilla.
This splint also provides superior pronation and supination control.
Long Arm Posterior Splint
This splint is used in
- Acute and definitive management of elbow, proximal and mid-shaft forearm, and wrist injuries
- Acute management of distal radial/ulnar fractures in children.
The splint extends from the axilla over the posterior surface of the 90-degree flexed elbow, and along the ulna to the proximal palmar crease.
Different Slings for Upper Limb Injuries
Slings are used to support an injured upper limb or to supplement treatment for another injury such as fractured ribs. There are many different slings, triangular bandages being most commonly preferred.
There are three types of sling
- the arm sling for injuries to the forearm,
- the elevated sling for injuries to the shoulder,
- the ‘collar-and-cuff’ or clove hitch for injuries to the upper arm and as supplementary support to fractured ribs.
Arm Sling
- The injured forearm is kept approximately parallel to the ground with the wrist slightly higher than the elbow
- An opened triangular bandage is kept between the body and the arm, with its apex towards the elbow
- Extend the upper point of the bandage over the shoulder on the uninjured side
- Bring the lower point up over the arm, across the shoulder on the injured side to join the upper point and tie firmly with a reef knot
- Fold the excess bandage over the elbow and secure with a safety pin
Elevated Sling
- Keep the elbow beside the body and the hand extended towards the uninjured shoulder
- Place an opened triangular bandage over the forearm and hand, with the apex towards the elbow
- Extend the upper point of the bandage over the uninjured shoulder
- Tuck the lower part of the bandage under the injured arm, bring it under the elbow and around the back and extend the lower point up to meet the upper point at the shoulder
- Tie firmly with a reef knot
- Secure the elbow as in the above method
Collar-And-Cuff
- Allow the elbow to hang naturally at the side and place the hand extended towards the shoulder on the uninjured side
- Form a clove hitch by forming two loops – one towards you, one away from you
- Put the loops together by sliding your hands under the
- Secure the wrist
- Tie the bandage firmly by extending the bandage behind the neck and tie firmly
Orthopedic Splints for Lower Limb
Posterior Ankle Splint
It is used in
- Acute severe ankle sprain
- Undisplaced, isolated malleolar fractures
- Acute foot fractures
- Soft tissue injuries.
The splint extends from the plantar surface of the great toe or metatarsal heads along the posterior lower leg and ends 2 inches distal to the fibular head. It should always end below the fibular head as that would not put common peroneal nerve at risk.
Stirrup Splint
This splint is commonly used in acute ankle injuries, isolated undisplaced malleolar fractures.
The splint extends from the lateral mid-calf around the heel and ends at the medial mid-calf The position of the function is with the ankle flexed to 90 degrees. This is the neutral position for the ankle.
A bulky Jones splint is a variation on the stirrup splint used acutely for more severe ankle injuries. The lower extremity is wrapped with cotton batting and reinforced with a stirrup splint.
Toe Plate Extensions
This splint is used for the toe immobilization, distal metatarsal, and phalangeal fractures, particularly of the great toe.
A plate is made by extending the casting material beyond the distal toes, prohibiting plantar flexion and limiting dorsiflexion. The upper extent is same as the posterior ankle splint.
Posterior Knee Splint
This splint is used in soft tissue injury and fractures around the knee
The splint should start just below the gluteal crease and end just proximal to the malleoli. It is also called cylinder splint.
The knee is positioned in slight flexion.
How to Splint Fractures Immediately After Injury
The injured patient should first be checked for any serious life-threatening injury that needs to be managed first. Call for help if not done, If quick evacuation is needed, splinting may be skipped to save time.
For splinting the limb, preferably expose the part by cutting the clothes. Open fractures need to be dressed before splinting.
If possible, padding using something like a jacket or other clothing can be done for the comfort of the patient.
After splint has been applied, pulses and sensation should be checked below the splint repeatedly to know if the splinting or bandaging is causing constriction.
Following general guidelines should be remembered
- If likelihood seems possible, treat the injury as a fracture until imaging can be done
- Even after splinting, the patient should reach definitive medical care as early as possible
- Patient is not to be moved before splintage of the affected part.
- Airway, breathing, and circulation take precedence over the splintage
- Do not attempt to locate a fracture by grating the ends of the bone together.
- Do not attempt to set a broken bone unless a physician will not be available for many days.
- Attempt to normalize the deformity but avoid excessive force. Instead, splint the limb in most plausible position.
- Dress the wound and control bleeding in an open fracture.
Upper Limb Injuries
Shoulder Injuries
Clavicle, shoulder, and upper arm injuries extending down to the elbow can be supported in clothing sling or a simple sling made of the bandage.
Flex the injured arm at the elbow and place the forearm across the chest. The palm of the hand should be turned in, with the thumb pointed up and the hand raised about 4 inches above the level of the elbow. Support the forearm in this position by means of a wide sling.

For better immobilization, the arm sling is wrapped to the person’s body with a large bandage encircling the person’s chest.
Alternatively, a figure-eight bandage may also be used.
Arm Fracture
Upper Arm
Place a pad or folded towel in the armpit, bandage the arm securely to the body, and support the forearm in a narrow sling.
Mid Arm Fracture
Use one well-padded splint on the outside of the arm. extending from the shoulder to the elbow. Fasten the splinted arm firmly to the body and support the forearm in a narrow sling.
Another method is to fasten two wide splints about the arm and then support the forearm in a narrow sling. Do not extend too far up into the armpit to avoid the risk of compression of the neurovascular structures.
Lower Arm Fracture
If the fracture is at or near the elbow, the arm may be either bent or straight. No matter in what position you find the arm, do not attempt to straighten it or move it in any way. Splint the arm as carefully as possible in the position in which you find it.
Forearm and Wrist

Injury to the forearm and wrist requires a straight supportive splint that secures and aligns both sides of the injury. It can be done with firm newspaper roll or open hardback book. A sugar tong splint is another choice.
The forearm has got two bones – radius and ulna. The deformity is more pronounced when both bones break. When only one bone is fractured, the other one acts as a splint and the arm retains a more or less natural appearance.
Apply two well-padded splints to the forearm, one on the top and one on the bottom from the elbow to the wrist and secure them in place by bandages.
After the splint is applied, put the forearm across the chest with the palm turned towards the chest and the thumb pointing upward. Support the forearm in this with the sling with the hand raised about 4 inches above the level of the elbow.
Hand Injuries
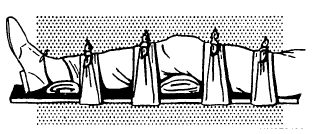
Multiple hand injuries can be splinted by ball and bandage where the patient holds a ball and hand is wrapped with a bandage.
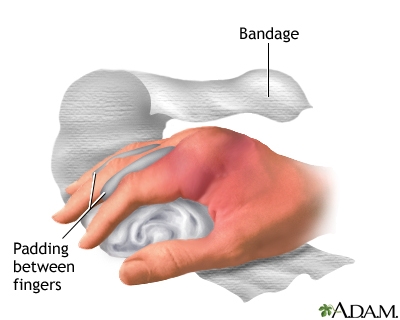
An injured finger can be buddy-taped to the adjacent, unaffected fingers, or it can be splinted with small pieces of wood or cardboard.
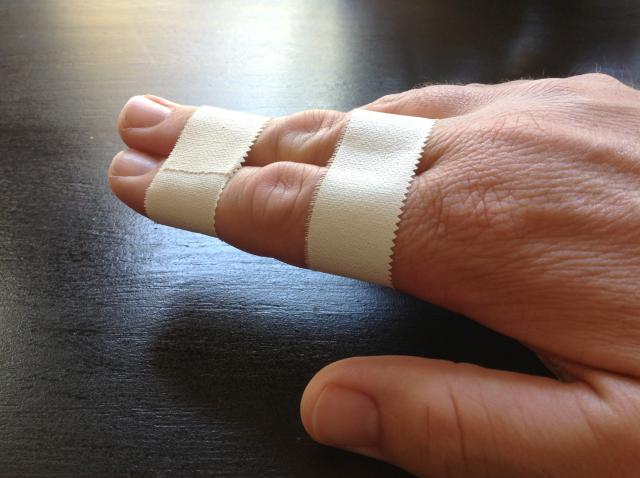
Image Credit: About First Aid
Lower Limb Injuries
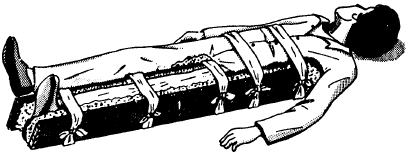
Pelvic and Hip Injuries
These injuries need complete immobilization of the person.
They are associated with massive bleeding and can be life-threatening or associated with life-threatening injuries.
The splints for these injuries should extend to the lower back and down past the knee of the affected side of the extremity and include ankle for absolute immobilization.
These patients should be moved on stretchers only. There are many ready-made splinting devices available for these injuries, most common being Thomas splint but these may not always be available and splints.
Femur Fracture Care
After carefully straightening the limb, apply two splints, one on the outside of the injured leg and one on the inside.
The outside splint should reach from the armpit to the foot and the inside from the crotch to the foot.
The splints could be bandaged all over the length of the splints. Alternatively, fasten the splints at least at following 5 points
- Around the ankle
- Over the knee
- Just below the hip
- Around the pelvis
- Just below the armpit
As an additional measure, the legs can then be tied together to support.
Special Note: In case of nothing being available, the injured limb can be secured to the uninjured limb to provide splinting. This method can be used to splint leg injuries as well.
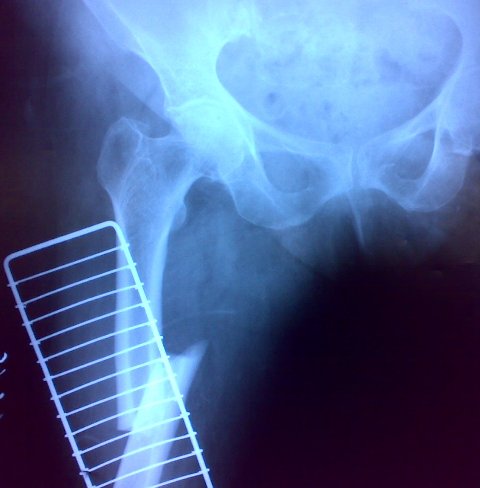
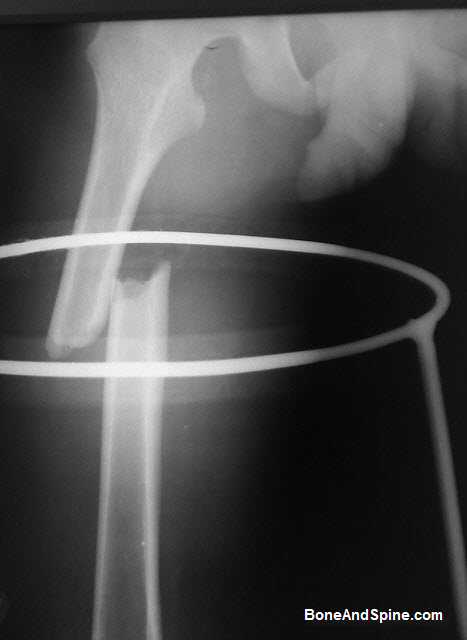
Special splints for femur fracture are also available.
Following two x-rays show inadequate splinting of femoral fractures. Both orthopedic splints, Thomas splint, and Cramer wire splint are having an inadequate and ineffective extent.
Knee Injuries
Knee injuries require splints that extend to the hip and down to the ankle. These splints are applied to the back of the leg and buttock.
 Leg Injuries
Leg injuries can be splinted by a posterior splint extending from thigh to base of toes or a sugar tong splint from knee to ankle.
Carefully straighten the injured leg and apply well-padded splints, one on each side of the leg and one underneath.
Alternatively, a pillow and two side splints can be used.
Place the pillow beside the injured leg, then carefully lift the leg and place it in the middle of the pillow. Bring the edges of the pillow around to the front of the leg and pin them together.
Now place one splint on each side of the leg over the pillow, and fasten them in place.
Ankle Injuries
Ankle injuries and foot injuries can be wrapped alone using a figure-of-eight pattern. The foot should be kept at a right angle in the splint to immobilize the ankle. A posterior splint or mediolateral supports can be used.
Rib Fracture
The primary concern is to avoid a loose piece of rib from puncturing a lung. The patient is put to rest, padded on the chest, and gently wrapped.
Precautions
Circulation must be checked after a splint or sling has been applied. If the limb swells this will make the bandages tighter and this may cause circulation problems.
Indications that a bandage may be too tight include:
- Absent pulse below the bandage
- Pallor or cyanosis[bluishness]distal to the bandage
- Cold limb distal to splint
- Pain
- Swelling
- Tingling or loss of feeling in fingers or toes