Last Updated on November 22, 2023
A radial Gutter splint is a splint that is applied on the radial aspect of forearm and sandwiches 2nd [index]and 3rd [middle] fingers to provide both volar and dorsal support.
Splints, as we know from our previous discussions are used to immobilize the injuries either temporarily or as definite treatment. Most common use of splints is in emergency settings but the splints can be used to provide rest in non-traumatic conditions.
Indications for Radial Gutter Splint
- Soft-tissue injuries to the second and third fingers
- Fractures of the second and third metacarpals
- Fractures of the phalanges of second and third ray
- Positioning for rheumatoid arthritis
- Laceration over the joints of the second and third phalanges or metacarpals
Contraindications
There are no absolute contraindication but open fractures and those with associated neurovascular insults need to be considered for surgical treatments and monitoring and the radial gutter splint may not be considered.
For angulated neck fractures of the second and third metacarpals, a volar intrinsic plus slab may be preferred.
Procedure of Radial Gutter Splint Application
Patient Preparation
Radial gutter splinting is usually tolerated without anesthesia. However, anesthesia or analgesia may be required in cases where a reduction is required. In such cases, the following may be used alone or in combination
- Hematoma block or nerve block
- Procedural sedation
- Administration of oral or intravenous pain medications
- NSAIDs
- Opioid
The correction of the deformity may be needed in
- Malrotated fracture
- Angulations beyond acceptable limits which are
- 10 degrees in second and third metacarpals
[Just to mention the acceptable limit is 20 degrees in the fourth metacarpal, 30° in the fifth]
A complete neurovascular examination should be performed after the splint has been applied.
Place the patient in a comfortable position (eg, seated or reclined). A sedated patient needs to recline or lie supine.
Cover the patient with a sheet to avoid splatter from the wet plaster.
The wrist has to be in 15-25 degrees of extension and fingers flexing gently as if holding a glass. An actual or imagined glass may be held. A can or a bandage wrap will also do. Alternatively, the patient can imagine holding a wine glass.
Application of Radial Gutter Splint
Apply the stockinette Stockinette should be applied longer than the extent of the splint and 2-3 cm beyond the overlying padding. Distal end should be cut to allow coverage for the second and third digits only.
[Later together, the stockinette and padding are pulled over the edges of the wet plaster to create smooth edges.]
A hole for thumb should be cut wide enough to avoid constriction of the thumb.
Place a piece of padding/cotton between the second and third digits to prevent skin maceration. The padding is wrapped over the stockinette, overlapping each layer by half the width.
Extend the padding should extend 2-3 cm beyond the overlying plaster on both ends. Leave nails exposed to assess for perfusion. The padding should appear smooth, creaseless and wrinkle-free.
Apply extra padding to the bony prominences.
In prefabricated plaster applications, the stockinette and padding are not required. [For the application of this plaster, just follow manufacturer’s advice]
The plaster length is measured from the proximal third of forearm to distal IP joint. Make a splint of plaster of Paris using a 4-inch bandage and 10-14 layers thick allowing 5mm of extra length on either end to allow for plaster shrinkage when wet.
The excess wet plaster on the ends will is folded over to create smooth edges. Measure and mark an opening on the plaster for placement of the thumb through the splint, and cut out the opening. Another and safer method is to cut the plaster in two halves from the thumb base and slit till the farther end.
Submerge the plaster and let the plaster escape. All all the bubbles to escape to allow allows the layers to bond together. Squeeze out the excess water by milking action.
Straighten out any wrinkles if present.
Apply the wet plaster, over the padding, to the lateral or radial surface of the forearm extending from the second DIP joint to the proximal third of the forearm.
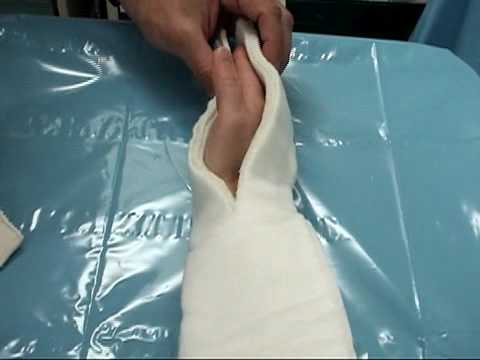
If the plaster is split, the two halves of the distal part of plaster are arranged anterior and posterior aspect of second and third metacarpals so as to sandwich second and third metacarpals.
If the plaster is not slit, the thumb is passed through the plaster hole and the plaster is rested on the radial aspect of fingers and wrapping them anteriorly and posteriorly.
Fold any excess plaster on the ends followed by folding of stockinette and padding on both ends, creating smooth edges.
Apply the bandage wrap over the wet plaster. Start distally, at the DIP joints of the second and third digits, and wrap proximally.
The thumb and fourth and fifth digit are left free.
Cut an adequate hole for the thumb. The thumb and the fourth and fifth digits should be left free. Avoid wrapping too tightly.
Mold the splint into the desired shape while the plaster is still wet. The wrist is in 15-25° extension, the thumb is abducted and flex the metacarpophalangeal joints to 70°. [ 90 degrees in metacarpal neck fractures]
Let the splint dry while the position is held.
The patient would feel some warmth due to the exothermic reaction of plaster setting but if the heat is too intense [ can occur with quick setting plasters and if hot water is used], remove the plaster to avoid a risk of thermal burns.
Once the splint is dry, check for neurovascular function and capillary refill.
Ask the patient to flex and extend fingers and enquire about any pressure points.
Clean any extra plaster on the patient.
After Splint Care
[Read more on plaster care]
The patient is instructed to rest and elevate the limb.
The patient should report back immediately in the emergency department if there is increased weakness or numbness or color change (pale or blue). Same should be done in cases of pain that does not relent, feeling of plaster constriction.
A spreading redness or streaking should be reported immediately too.
Plaster should be kept dry and clean.
Patient should not stick any items into the splint to scratch an itch. Sticking objects into the splint can wrinkle the padding and lead to pressure sores. It may also cause a break of skin and infection that would be overlooked because of the presence of covers.
Call the patient back for a recheck after 48 hours and further as necessary.
Complications of Radial Gutter Splint
[Read more on complications of plaster]
- Skin burns form plaster heat during setting
- may occur when very hot water is used]
- Wrapping towels or blankets around the splint after application to shorten drying time may cause excess heat.
- Pressure sores
- provide extra padding at prominences
- Avoid creases.
- Contact dermatitis
- Antihistmines provide relief
- Swelling and pain
- Remove splint and elevate the limb
- Reapply after swelling is gone.
- Joint stiffness
- Noticed after splint removal
- requires physical therapy.
References
- Howes DS, Kaufman JJ. Plaster splints: techniques and indications. Am Fam Physician. 1984 Sep. 30(3):215-21
- Hutchinson MJ, Hutchinson MR. Factors contributing to the temperature beneath plaster or fiberglass cast material. J Orthop Surg Res. 2008 Feb 25. 3:10
- Playe SJ, Filener WS. Principles of Splinting. Hart RG, Rittenberry TJ, Uehara DT. Handbook of Orthopaedic Emergencies. Philadelphia, Pa: Lippincott-Raven; 1999. 92-115.